Third-party platforms and services can be easily integrated into Application Workspace with the connectors feature.
Currently, the following connectors are available:
- Citrix StoreFront
- Application Workspace Setup Store
- Application Workspace
- Microsoft Azure Virtual Desktop
- Microsoft Print Server
- Microsoft RDS
- Microsoft Store
- Microsoft System Center Configuration Manager
- Nutanix Frame
- Okta
- VMware Horizon
A connector is used only when importing and updating resources. There is no need for a high-availability infrastructure ( e.g. multiple Application Workspace Satellite Servers). When you delete a connector, all resources that are already imported in Application Workspace are not affected.
Connectors list
This list displays all connectors currently available in the Application Workspace System.
Selecting multiple rows from the table
- To select multiple adjacent rows, click on the first row, then hold down the Shift key and click on the last row in the range; all rows between will be selected.
- To select multiple non-adjacent rows, hold down the Ctrl key (or "Command" on Mac) and click on each row you want to select individually.
- To select multiple adjacent rows using the mouse only, click and hold the left mouse button on the first row, then drag the cursor up or down across the rows to highlight the desired ones.
- Selecting rows using only the keyboard is not possible.
Table toolbar
To create a new connector, click on the  Create button; to view the details of a connector or edit it, double-click its entry or select the connector and click the
  Edit button.
 Resources - Displays all the resources available in the remote system. This option is available for the On-demand synchronization method. You can select one or multiple resources and click Create package to create new packages within your Application Workspace System. Note that when creating a package, the Default value of the Package type represents the value you set for the connector, in Overview > Default package type.
 Updates - Displays a list with all the updates available for the packages created through the connector. This option is available for the On-demand synchronization method.
 Synchronize - You can choose only to check the newly available updates or download and apply them.
- For an On-demand type connector, Download and apply updates updates only the packages you created based on the connector resources.
- For a Synchronize type connector, Download and apply updates updates all existing packages and imports new ones.
 Remove - Remove the connector from Application Workspace.
 Views gives you control on how the table is displayed. The default view contains all your connectors in alphabetic ascending order, and only a few columns: Name, Type, Direction, Method, Enabled and Server.
You can create your own personalized view of the table, by filtering the connectors or adding/deleting columns and clicking Save as in the drop-down menu of  Views.
Detailed view of a connector
See below the description of each screen in the detailed view of a connector, and what actions you can perform in each of them. Only the Settings screen has specific elements for each type of connector, all the other ones are common for all connectors. See the corresponding connector article for more information about each of them.
Overview screen
On the Overview screen, you can view/configure the global settings for the connector.
Main menu
In the main menu of the Overview screen, you can access the following options:
Resources - Displays all the resources available in the remote system. This option is available for the On-demand synchronization method. You can select one or multiple resources and click Create package to create new packages within your Application Workspace System. Note that when creating a package, the Default value of the Package type represents the value you set for the connector, in Overview > Default package type.
Updates - Displays a list with all the updates available for the packages created through the connector. This option is available for the On-demand synchronization method.
Synchronize - You can choose only to check the newly available updates or download and apply them.
- For an On-demand type connector, Download and apply updates updates only the packages you created based on the connector resources.
- For a Synchronize type connector, Download and apply updates updates all existing packages and imports new ones.
Remove - Remove the connector from Application Workspace.
Screen elements
Server - specifies the type of server handling the request. This can be either a standard Application Workspace server or an intermediary server that routes and processes requests between environments, such as between an on‑premises server and a cloud‑based server.
Direction - Determines in which direction the connector sends information:
- Push - The connector will create packages in the remote system.
- Pull - Packages can be created from resources or imported from the remote system.
Default package type - This option determines the way a package will be handled after creation:
- Managed - the package is eligible for automatic updates and it has an action set that is locked for editing. You are still able to add new action sets to this package.
- Unmanaged - the package is not eligible for automatic updates and no locked action sets are added.
Type - Cannot be changed once the connector is created.
Method - Determines how the connector should be synchronized:
- On-demand - Synchronizes only the packages you created based on the connector resources.
- Synchronize - This option will automatically synchronize all packages with new available information.
Package name prefix - The default prefix used for the names of the new packages from the connector, which will help you to easily identify all packages originating from a certain connector.
Entitlements screen
This screen is used to manage entitlements on packages created through the connector. This allows you to assign a default set of entitlements for all connectors. Some connectors support importing entitlements from the remote system.
This screen is available only when the connector is created using the synchronized method.
Import entitlements section
With the import entitlements functionality enabled, you are able to add matching policies to match an identity (user, group, device or device collection) configured in the remote system with an identity known within Liquit.
Add matching policy dialog box
Overview tab
Identity Source - The Application Workspace identity source to match users and groups from the remote system.
Applies To - Which Application Workspace identity types (user, group, context, device, device collection) inside the selected identity source should be matched.
Property - The property of the Application Workspace identity to use when matching with the remote system.
Value transformation tab
Compare - What operator needs to be used on the property selected in the Overview tab.
Match - The regex used to match part or all of the properties from the remote system; use .\* to match all of the properties.
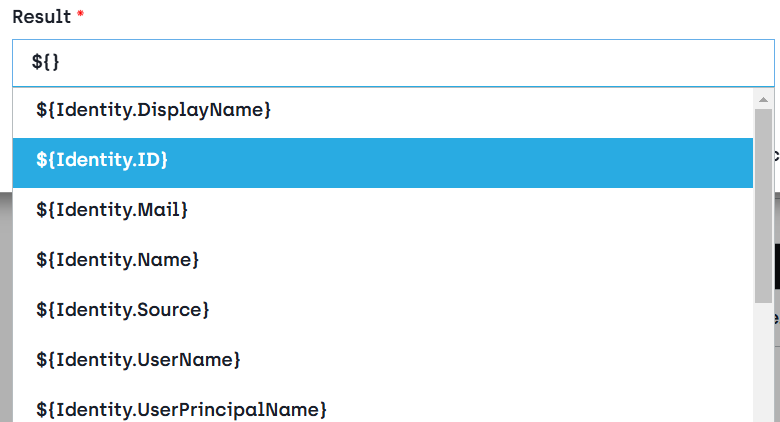
Result - The value to compare against the regular expression's result. To match against the exact same property, use ${0}. To match against a different property from a Liquit Identity, use one of the predefined identity variables that appear in the drop-down list of the field when you try to edit it. See Variables for a complete list of all predefined variables within Application Workspace.
Settings tab
Keep the default settings for publishing packages on the user's devices or override them. See Packages for more information.
Manual entitlements
With the manual entitlements functionality enabled, you are able to add entitlements by hand. You can do so by selecting the + Add static button in the table toolbar.
Add static dialog box
In the Overview tab select the Application Workspace identity (user, group, context, device or device collection) you want to entitle.
In the Settings tab keep the default settings for publishing packages on the user's devices or override them. See Packages for more information.
Synchronization profile screen
Synchronization profiles allow you to specify whether the Application Workspace System or the remote system is controlling some of the packages' information.
The following options are available:
Synchronize from connector - If the entity exists in Application Workspace, it is updated with the value provided by the remote system. Application Workspace will not attempt to create entities if they don't exist.
Synchronize from connector, create entity if not exist - Updates the existing entities and creates new entities if they don't exist in Application Workspace yet.
Set from connector during creation - Updates the existing entities and creates new entities if they don't exist in Application Workspace yet. Uses the value provided by the remote system only initially and it can be modified without it getting changed by the connector afterwards.
Create entity from connector during creation - Associates entities and creates new ones if they don't exist in Application Workspace yet. The entities can be modified after creation without them getting changed by the connector afterwards.
Static - If you select this option, an adjacent empty field or check box appears, that lets you configure a permanent value for this package option.
Ignore - Never retrieve the value/entity from a remote system.
Releases screen
This page allows you to define the way releases should be created on packages. For more information about each type of publishing stage see Packages.
The Test and Acceptance stages are available only when you have a Release and Patch Management license.
Publish - The stage to which the packages are published by default.
Enable release retention - Enables the Remove releases older than and Keep number of releases sections on this screen.
Remove releases older than section - Set the number of days after which the releases are automatically removed.
Keep number of releases section- Set the number of releases that should be preserved.
Managed Packages screen
This screen shows a list of packages that are managed by this connector.
Auditing screen
View a comprehensive log of changes to this connector, displaying the identity behind each modification.
This screen is available only if the auditing is enabled in the Database Event Collector. For more information, see Auditing.