Here is where you'll learn about everything related to the packages you make available to your users.
Packages list
This list displays all licenses currently available in the Application Workspace System.
To create a new package, click on the  Create button.
The  Edit button has two behaviours:
- If you select a package from the table and click Edit, it opens the package. Just like when you double-click a package from the list.
- If you select multiple packages from the list and click Edit, the Add entitlements dialog box opens, where you can assign identities to the current package just like in the Entitlements screen of a package. It is just a shortcut.
Selecting multiple rows from the table
- To select multiple adjacent rows, click on the first row, then hold down the Shift key and click on the last row in the range; all rows between will be selected.
- To select multiple non-adjacent rows, hold down the Ctrl key (or "Command" on Mac) and click on each row you want to select individually.
- To select multiple adjacent rows using the mouse only, click and hold the left mouse button on the first row, then drag the cursor up or down across the rows to highlight the desired ones.
- Selecting rows using only the keyboard is not possible.
Table toolbar
From the table toolbar you can access the Release overview, Recycle bin and create personalized views of the list, all of which are described in the following sections.
Release overview
The release overview can be accessed by clicking on the  Release overview button in the packages table toolbar.
This overview is intended to help you easily determine which packages need to be updated. It displays the name and type of a package, if it is enabled or managed, the version number (if they exist) corresponding with all release stages (Development, Test, Acceptance and Production), and the source of the app (the Application Workspace Setup Store for example).
The release overview for packages is available only when you have a Release and Patch Management license.
Recycle bin
The recycle bin can be accessed by clicking on the  Recycle bin button in the packages table toolbar.
When you remove a package, it will be moved to the recycle bin and will remain here until the Clean Packages scheduled task is executed or until you delete it from here.
The following actions are available in the recycle bin:
 Restore - Restores one or more packages you previously selected. Whenever Application Workspace encounters a package with the same name, you will be prompted to rename the package to avoid duplicates. When a package is successfully restored, it is moved back to the list of packages and can be assigned and edited like any other package within the list.
 Remove - Permanently removes one or more packages you previously selected from the system. Keep in mind that there is no way to restore them afterwards.
Views
 Views gives you control on how the table is displayed.
The default view contains all your packages in alphabetic ascending order, and only a few columns: Name, Type, Enabled and Display name.
You can create your own personalized view of the table, by filtering the packages or adding/deleting columns and click Save as in the drop-down menu of Views.
You can choose to save it for your own personal account or for the zone to which your account belongs so that all other users with admin privileges will have access to your view.
Create package dialog box
There are 7 types of packages that you can create. All these types come with predefined basic settings, except for Custom package which is blank.
- Install MSI
Install an .MSI package, by uploading it or providing Application Workspace the network credentials to access it. - Install Mac App
Install an app via a .PKG file on an MacOS platform. - Custom package
Unlike the other types of packages that have some settings preconfigure for you to cover the basics, a custom package represents a complete blank template. - Local application
Configure a launch action for an existing local app from the user's device. - Modify group membership
Change the group memberships for Microsoft Entra ID (Azure AD) and Active Directory. As a prerequisite for Microsoft Entra ID (Azure AD), you need to go to Identity Sources > Settings > Synchronization > Modifications and select Group membership. As a prerequisite for LDAP, you need to go to Identity Sources > Settings > Synchronization > Modifications and select All. - Remote application
Deploy an app that launches a Remote desktop session. - Remote control
Deploy a remote package to the user device and launch a remote control session for that device via your desired remote desktop software application. - Web application
Make a link available to your users, that launches when they click on the Workspace app or when they log in for example.
The Superseded by products information is displayed only in the Create new package dialog box. It displays all the product versions within Application Workspace Setup Store that supersede the currently selected version.
Detailed view of a package
See below the description of each screen in the detailed view of a package, and what actions you can perform in each of them.
Overview screen
The overview screen provides basic information of the package currently opened.
Type - The type of the package. This is an information purpose only field. The only exception is the Remote application type of package, which has Remote auto filled in for this field and must not be changed.
Priority - Determines the execution order when multiple packages are assigned to an event (on a user or device entitlement); the order of execution is from low to high.
Agent Required - Determines if the package is available only when a Application Workspace Agent is running.
Offline - Determines if the package is available for users that use the offline mode of the Application Workspace Agent; this causes the package content to be distributed on login/refresh, to ensure that the package is available for launch/installation actions. This is useful for example in situations where the user wants to start an application, but his device is on a remote location without an internet connection, or the company policy forbids connecting to unknown access points.
User auto launchable - When enabled, users can choose to start this package on logon by enabling the Autolaunch option in the context menu of the app. This feature is available only with events enabled; events are enabled by default.
Events screen
Displays all events that are associated with the package.
The following columns are available:
Type - The type of the event associated with the package.
Status - Shows whether or no the event was completed successfully.
Identity - The user that triggered the event. For example, the user who initiated a package launch.
Device - The device the user was logged on when the event was triggered.
Package - The name of the package associated with the event. This column is hidden by default.
Time - The date and time the event was triggered.
Auditing screen
View a comprehensive log of changes to this package, displaying the identity behind each modification.
This screen is available only if the auditing is enabled in the Database Event Collector. For more information, see Auditing.
Entitlements screen
Allows you to assign identities like users, user collections, groups, devices, device collections or contexts to the current package. This grants users or devices access to an application.
To view the details of an identity or edit it, double-click its entry. The Edit entitlement dialog box will open with the following options:
Overview tab
Identity - The display name of the existing identity you selected for this entitlement.
Stage - The release stage used for this identity; this feature is only available for Release and Patch Management license.
Publish - The package can be published in one of these ways:
- Hidden - The package is available to the user but is hidden. This can be useful for example if you only want to start this application with an event.
- Catalog - Publishes the package to Catalog, where users can get/request the application if they need it.
- Workspace - Publishes the package to Workspace. The user can remove the package which will automatically return to Catalog.
- Forced - The package is pushed forcefully on Workspace and cannot be removed by the user.
Native Icons - Select where the native icon of the package should be displayed for Windows or Mac OS. For it to work, an Agent must be running on devices.
- Desktop - The icon will be displayed on the user's desktop, on a Windows OS.
- Start Menu - The icon will be displayed in the user's Start Menu, on a Windows OS.
- Taskbar - The icon will be displayed in the user's Taskbar, on a Windows OS. Issues have been reported with Windows version 10 1903 or higher; see known issues for more details.
- macOS Desktop - The icon will be displayed on the user's desktop, on a macOS.
Approver - Gives the identity the rights to request and approve an application from Catalog. Works only if an app is published in Catalog, from where the user is able to request it following the steps described in Catalog.
The Managed column in the Entitlements screen denotes that the entitlement comes from a connector, configured as a synchronized connector that manages the package, like Application Workspace, Remote Desktop and VMware Horizon. It cannot be modified.
Events tab
An event can be configured to trigger an action on this package. To add an event, click on the Add button; to edit an existing one, double-click its entry.
The following triggers are available:
Application Workspace Logon - Triggers when a user logs in to the Application Workspace.
Refresh - Triggers when a refresh is triggered.
Session connect - Triggers when a remote desktop session is connected/reconnected.
Session disconnect - Triggers when a remote desktop session is disconnected/interrupted.
Session lock - Triggers when a desktop session is locked.
Session unlock - Triggers when a desktop session is unlocked.
Agent startup* - Triggers when the Agent service is started.
Device startup* - Triggers when the device is started. This option does not work for devices with Windows OS that have the Fast startup or Hibernate enabled.
Device shutdown* - Triggers when the device is shutdown. This option does not work for devices with Windows OS that have the Fast startup or Hibernate enabled.
User login - Triggers when a user logs in to the device.
User logout - Trigger when a user logs out of the device.
Network change - Triggers when a network (interface/adapter) change occurs. The changes are grouped together when there is less than 5 seconds between them and will happen over a maximum time frame of 20 seconds.
* This event is available only on device assigned entitlements.
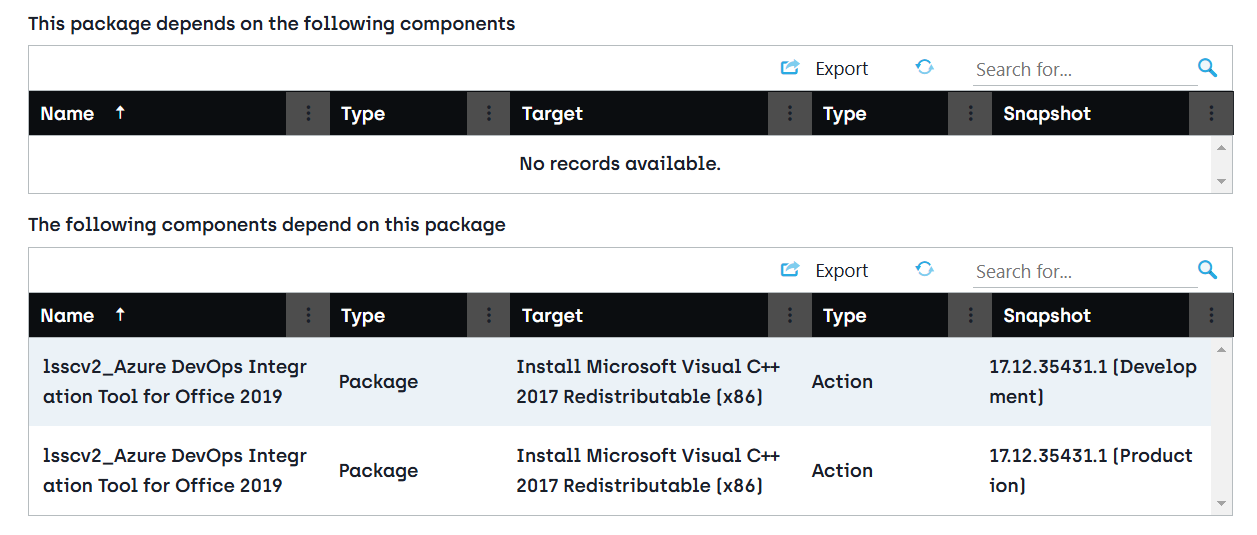
Dependencies screen
Lists all the components this package depends on and components that depend on this package. When you double-click an entry, the referred action is displayed.
Note that only package type actions can create dependencies e.g.: distribute, install, launch, repair, uninstall.
Tags screen
View, remove or add tags to your package. To add a tag, simply start typing in the lookup field for the desired tag and select it from the results lists. Or select the browse button  at the right of the lookup field to open the Tags dialog box and view all the tags available. To view the details of a tag or edit it, double-click its entry.
Note that the source of a managed tag is a system certificate and it cannot be changed.
Catalog section
The catalog section provides basic options to configure the manner in which the application is displayed for the user in the Catalog tab of Application Workspace.
Overview screen
Display name - The name displayed in the Catalog for the user. By default, it is the name you give to the app when you created it, but you can write a different name in this field.
Featured on the catalog - When checked, the package will be displayed in the Featured section of the Catalog, at top of the tab. See Catalog for more details.
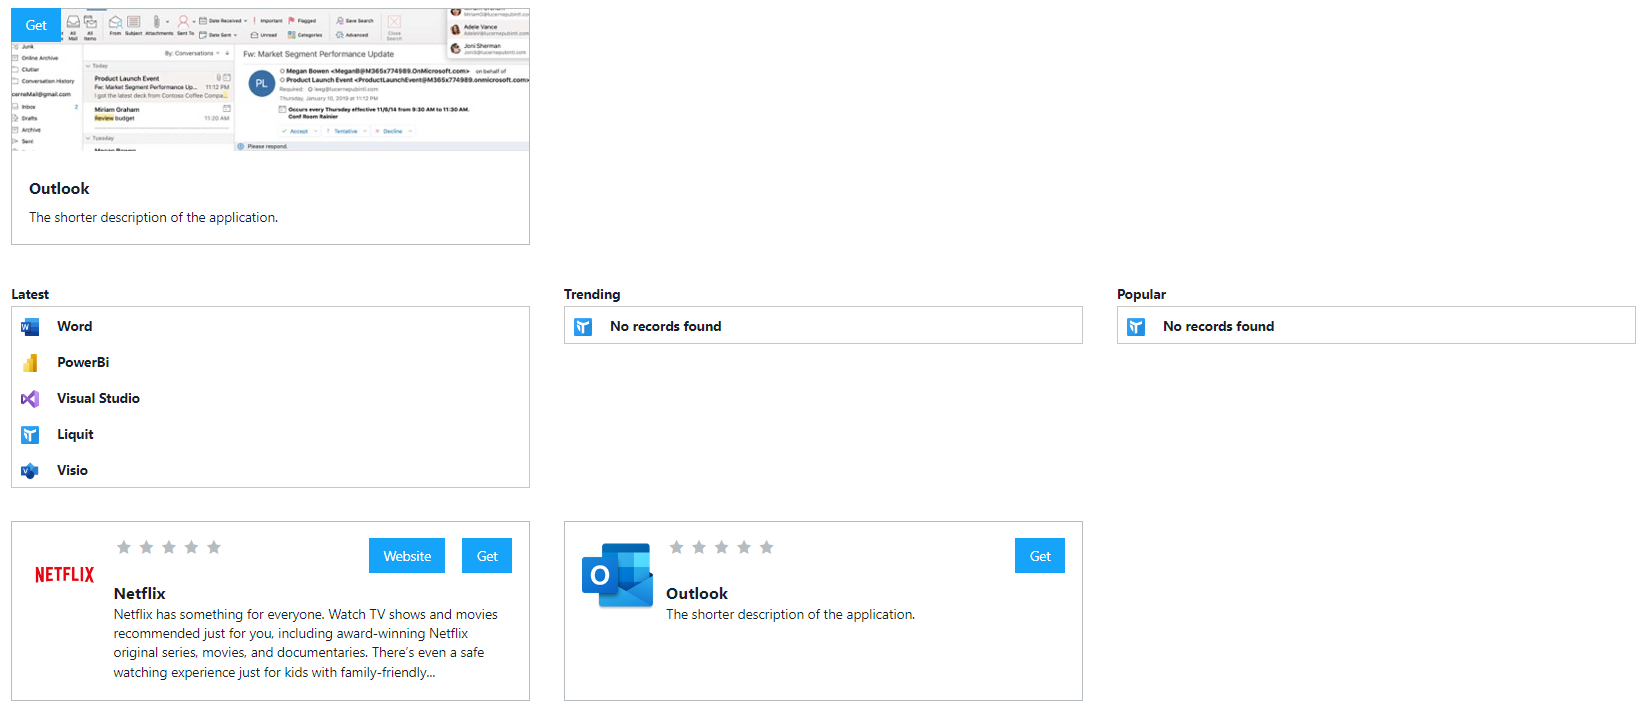
Excerpt - A shorter version of the application description, displayed on the application tiles. See the Outlook app in the image below.
Description - The longer version of the application description, displayed in the catalog information screen. See Catalog for more details.
Website - Provide users a website associated with the application. This can be the official website or for example a knowledge base article within the organization. The Website button will be displayed on the application tiles and catalog information screen. See the Netflix example in the image above.
Reviews screen
The reviews screen lets you manage the reviews written by the users for the application. These can be moderated or deleted.
Media screen
The media screen allows you to add images which are displayed in the user catalog. You can choose to display the image selected as:
- Banner displayed only for apps that have the Featured on the catalog option checked.
- Screenshot displayed in the catalog information screen of the app.
- YouTube Videos displayed in the catalog information screen of the app.
For YouTube videos to load properly, you need to add the following URL to CORS and CSP in the Security Settings: https://*.youtube-nocookie.com
FAQ screen
The FAQ allows you to add frequently asked questions to the user catalog.
When you click on the Create question button, a dialog pops-up which allows you add a question and answer. You even have some basic formatting options at your disposal for the answer.
Categories screen
Displays a list of categories associated with the current package.
View, remove or add categories to your package. To add a category, simply start typing in the lookup field for the desired category and select it from the results lists. Or select the browse button at the right of the lookup field to open the Categories dialog box and view all the categories available. To view the details of a category or edit it, double-click its entry.
For more information see Categories.
Licenses screen
Displays a list of licenses associated with the current package.
View, remove or add licenses to your package. To add a license, simply start typing in the lookup field for the desired license and select it from the results lists. Or select the browse button at the right of the lookup field to open the Licenses dialog box and view all the licenses available. To view the details of a license or edit it, double-click its entry.
For more information see Licenses.
Releases section
An individual package can have different package snapshots in different stages. Package staging allows you to test updates in multiple stages of the application lifecycle before its deployed to all users in the Production stage. The available stages are:
- Development - This is the stage in which you can update the package. Assigning this stage to users is not recommended as any change in the package will be live for the assigned users right away.
- Test - This is the stage you can assign to users for test purposes. Usually, test users test the package on a technical level. (e.g. check if the package actions work as expected)
- Acceptance - This stage is used for acceptance purposes. Assign users who can accept the package prior to updating the application to production in this stage. Usually, acceptance users test the package on a functional level. (e.g. check if the application works as expected)
- Production - This is the stage most widely used in production environments. After a package is changed within Development, tested within Test and accepted in Acceptance by the users, you can place the package in production.
The Test and Acceptance stages are available only when you have a Release and Patch Management license.
Packages can be modified only in the Development stage.
When a package in the development stage is being distributed/installed/launched then both distribute and install action sets will be executed forcefully every time the package is triggered. The configured action set frequencies will be ignored.
Overview screen
Displays the release dashboard and a list of cancelled and archived versions of a package.
- Cancelled stage - a stage is cancelled when:
- you overwrite the version of the stage with a package version from another stage
- you skip it by moving a package version from a lower stage to a stage higher than the current one
- you delete the stage by clicking on the Bin icon on the stage
- Archived stage - only a version from the Production stage can become archived, after you overwrite it with a new version.

Each of the snapshots listed in the table can be recovered at any time; what's more, you can choose to publish it to any stage. Just select the desired snapshot, then click Publish in the table toolbar and in the Publish "Release" dialog box that opens, select the stage to which you want to publish the snapshot and change the name and description of the release if needed.
Shortcuts screen
Shortcuts allows you to define multiple icons and names for a single package that are published within the Workspace, but are listed as a single item in the Catalog. Any of the shortcuts can be disabled, thus hiding them when the application is added to the Workspace.
A "primary" shortcut is always available on a package and can't be removed. It contains the default icon displayed to the user, which you can overwrite, and allows you to override the display name configured in Catalog section > Overview.
Variables screen
Displays all the system variables configured in Workspace > Variables. Variables give you the tools to be as dynamic as possible as they can currently be defined on different levels. The inheritance flows top-down and supports local override. This means a variable defined on system level, can be used in contexts and packages. That same variable could be overridden on for example package level, to provide dynamic customization based on the entity.
In the Development stage you can override any of the existing variables by clicking on them or you can create new variables by clicking on the Create variable button in the table toolbar.
For a variable named 'MY_CUSTOM_VAR' you must use the following notation in fields that support variables: ${MY_CUSTOM_VAR}
For more information about system variables see Variables.
Filters screen
Filters allow you to define when a package is available for a user/device based on certain requirements. For example, only enable a package if a certain file is available on the device that is used to access the Application Workspace.
Filters are grouped by filter sets, and you can use the 'AND' or 'OR' operators between sets of filters and within sets.
For detailed information about all the filters available for a package see Filters.
Actions screen
Here you define the behaviour of the package. Actions are grouped by action sets, and you can use the 'AND' or 'OR' operators between sets of actions and within sets. For a detailed information about all the actions available for a package see Actions.
Note that you can change the order of execution of actions sets, within the same type of action sets, simply by clicking on the title bar of the action set and dragging and dropping it in the new location like shown below:
Create action set dialog box
Overview tab
Type - Determines how actions are executed:
- Distribute - Is used to download all content that is needed for installation on devices and is executed only once per device.
- Install - Is used to install the package on devices. Use the frequency option to specify when an installation is required.
- Launch - Is executed each time the user clicks on the smart icon of the package.
- Repair - Is executed when the user clicks on Repair
 in the Context menu of the app, in Workspace.
The Repair option becomes visible to a user, only after he clicks on an icon that implies executing an action on his device, e.g. copying files or launching an .exe file. Meaning for a package with a Distribute, Install or Repair action set configured. It is not displayed for apps that open in the browser.
If no Repair action set is defined in case of a package containing Distribute or Install action sets, the install actions will be relaunched.
- Uninstall - Is executed only when it's triggered by an uninstall event configured for the identity entitled or triggered by a different package.
Shortcut - Shortcut selection is available only for a Launch action set.
Process - Determines the order the actions within the action set are executed:
- Sequential - The actions in the action set are executed in order, stopping at the first error.
- Sequential, ignore errors - The actions in the action set are executed in order, ignoring errors.
- Stop at first effective action - The first effective action in the action set will be executed while the rest will be ignored.
- Stop at first successful action - The first successful action in the action set will be executed while the rest will be ignored.
Frequency - Depending on the action set type there will be different options:
- Always - the action will always be executed.
- Once per user - the action will be executed only once per user.
- Once per device - the action will be executed only once per device.
Filters tab
Here you can define conditions which determine if the actions within the set will be executed. To read more about each filter, see Filters.
Create action dialog box
Depending on the type of action you select, there are 3 tabs available General, Advanced and Filters.
The elements in the General, Advanced tab vary according to the type of the action. To read more about each action, see Actions.
In the Filters tab you can set in which conditions the action should be executed. To read more about each filter, see Filters.
Further reading
What is a managed app
How does DTAP work in Application Workspace?
Repairing a package
Create a managed package using Application Workspace Setup Store connector
Deploy a package with hidden entitlement
Deploy a package with multiple shortcuts
Set up and use remote control