A context represents a group of filters which determine which devices or users are members of the context. These filters can include, but are not limited to, location filters and user attributes. They allow you to assign variables, packages, access policies and deployments dynamically, and if they don't meet your needs you can always create a script type context based on your own script.
Context awareness in Application Workspace offers the following possibilities:
- Restrict/give access based on certain attributes, as it allow you to filter based on device, session and user properties.
- Publish applications based on the department field as configured within your Active Directory.
- Combine information about a device and user to assign applications.
Scenario: User A is granted access to the application only if he is logged on Device B. - Assign administrative role to a user having its device within a company network, and assign any other device location to automatically receive normal user permissions.
Contexts list
This list displays all contexts currently available in the Application Workspace System.
Selecting multiple rows from the table
- To select multiple adjacent rows, click on the first row, then hold down the Shift key and click on the last row in the range; all rows between will be selected.
- To select multiple non-adjacent rows, hold down the Ctrl key (or "Command" on Mac) and click on each row you want to select individually.
- To select multiple adjacent rows using the mouse only, click and hold the left mouse button on the first row, then drag the cursor up or down across the rows to highlight the desired ones.
- Selecting rows using only the keyboard is not possible.
The Type of a context (Filter, Script) cannot be changed after creation.
Table toolbar
To view the details or edit a context, double-click its entry or select the context and click on the  Edit button from the table toolbar.
To create a new context, click on the  Create button.
 Views gives you control on how the table is displayed. The default view contains all your contexts in alphabetic ascending order, and only a few columns: Name, Type, Enabled, Authenticator and Priority.
You can create your own personalized view of the table, by filtering the contexts or adding/deleting columns and click Save as in the drop-down menu of Views.
Detailed view of a context
See below the description of each screen in the detailed view of a context, and what actions you can perform in each of them.
Overview screen
Displays the same information as in the Create context dialog box you used when you created the context.
The authenticator will be used only if this context is primary. The hierarchy of contexts is determined by the value of the Priority field in this screen.
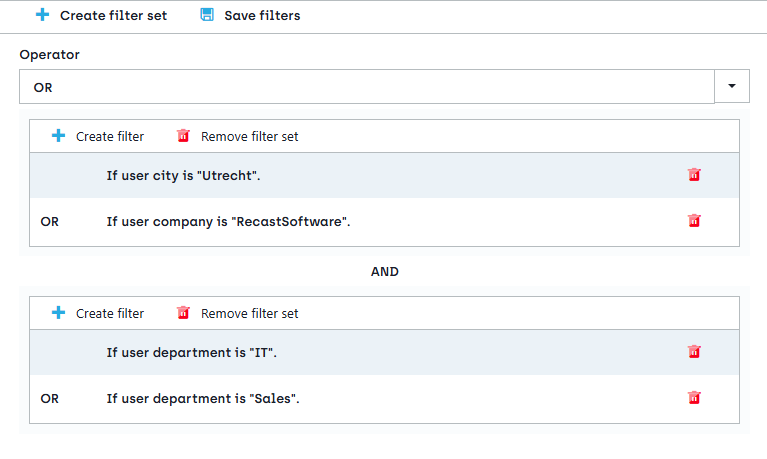
Filters screen (available only for Filter type contexts)
Filters enable you to configure conditions that must be met for devices/users to be automatically added to the context.
After you finish configuring filters/ filter sets, you must click Save on the screen toolbar, otherwise your changes will be lost.
Script screen (available only for Script type contexts)
In case you need to cover a more complex scenario an the pre-defined filters are not sufficient, you can use this screen to create your own script to define a context.
Below is a sample script that checks if a user is member of a certain group or if he uses a Workstation type device.
(
    (identities/any(d:d eq 'Azure AD\00000000-0000-0000-0000-000000000000'))
        or
    (device/platform/type eq 'Workstation')
)
Devices screen
Shows a list of all devices that are a member of the current context.
User-based filters are ignored when showing this list.
Variables screen
Contexts let you override system wide variables and define completely new variables.
To add a new variable click the Create variable button in the table toolbar and enter your new key value pair.
To edit an existing variable, simply click its entry and enter a new value for it.
For more information, see Variables.
Access Policy screen
Here you can assign access policies at context level, and grant or deny access to your organizations apps in advanced scenarios. You can for example assign different policies to users connecting to the Application Workspace from a certain IP Address.
For more information, see Access Policies.
Content Access screen
Allows you to override the zone-level configuration of the location from which Agents should retrieve content.
As you can see in the GIF above, at the top rightmost part of the screen you have the following options:
-
Configured at zone
 keeps the location you configured in Manage > Portal > Content Access.
 -
Configured at context
 lets you add new locations. Note that in this mode, the zone location is inherited automatically, but you can delete it if needed.
All locations you set at context level will be lost if you toggle from Configured at context to Configured at zone .
For more information, see Content Access.
Agent Settings screen
Allows you to override the zone-level configuration of Agent settings.
As you have multiple options in this screen, we will explain each one of them below.
At the rightmost part of each setting, you have the following options:

- Configured at zone keeps the settings you configured in Manage > Portal > Agent Settings.
- Configured at context lets you override the respective zone-level configured setting.
In the drop down of each setting you have three options:
-
Local agent configuration overrides the settings defined in the
agent.json/agent.xmlfile. See Application Workspace Agent Configuration or Liquit Workspace Agent Configuration for more information about all the options from this file. -
Enabled and Disabled overrides the local Agent configuration by enabling or disabling this setting.
For more information, see Agent Settings.
Portal Settings screen
Allows you to override the zone-level configuration of the portal settings for the given context.
At the rightmost part of each setting, you have the following options:

-
Configured at zone
keeps the settings you configured in Manage > Portal > Portal Settings. -
Configured at context
lets you override the respective zone-level configured setting.
Download Agent for Windows and Download Agent for macOS can be set only globally for a certain zone, therefore you cannot change them in this screen. To change these settings, go to Manage > Portal > Portal Settings.
For more information, see Portal settings.
User Settings screen
Allows you to override the zone-level configuration of the user settings for the given context.
At the rightmost part of each setting, you have the following options:

-
Configured at zone
keeps the settings you configured in Manage > Portal > User Settings. -
Configured at context
lets you override the respective zone-level configured setting. -
 allows users to change this setting on their device as they choose fit.
 -
 blocks users to change this setting on their device.
For more information, see User Settings.
Login Settings screen
Allows you to override the zone-level configuration of the login settings for the given context.
At the rightmost part of each setting, you have the following options:

-
Configured at zone
keeps the settings you configured in Manage > Portal > Login Settings. -
Configured at context
lets you override the respective zone-level configured setting.
For more information, see Login settings.
Packages screen
View a list of all packages currently assigned, assign new or remove existing ones.
To view the details of a package or edit it, double click its entry.
To add a package, simply start typing in the lookup field for the desired package and select it from the results lists. Or select the browse button  at the right of the lookup field to open the Package dialog box to view all the packages available. When assigning the package, you will be prompted to choose between different stages that should be published to the user (Development, Test, Acceptance or Production).
Note that you can override an entitlement for a package, via Context, Device collections, Groups, or user-level and the lowest stage will take priority. The lowest stage is Development and the highest stage is Production.
Scenario:
- User1 is directly entitled for PackageA in Production stage.
- User1 is also part of a device collection that has PackageA assigned with Test stage.
In this scenario, the Test stage version of the package will be deployed to the user, as it is of a lower priority.
To see all the entitlements for a package, go to Manage > Workspace > Packages > Entitlements
For more information about publishing options and events, see Packages.
Deployments screen
View a list of all deployments currently assigned, assign new or remove existing ones.
To view the details of a deployment or edit it, double-click its entry.
To add a deployment, simply start typing in the lookup field for the desired deployment and select it from the results lists. Or select the browse button
at the right of the lookup field to open the Deployment dialog box to view all the deployments available.
You will be prompted to select the publishing stage.
For more information, see Deployments.
Auditing screen
View a comprehensive log of changes to this context, displaying the identity behind each modification.
This screen is available only if the auditing is enabled in the Database Event Collector. For more information, see Auditing.