Overview
We get many questions about how to launch provisioned Universal Windows Platform apps from within Application Workspace. In this article, we will use a common app: Snip & Sketch.
UWP apps are designed to work across platforms and can be installed on multiple ones including Windows client, Windows Phone, and Xbox. All UWP apps are also Windows apps, but not all Windows apps are UWP apps.
Appx is Microsoft's file format used to distribute and install these apps on the Universal Windows Platform. Appx is a .ZIP-based file containing the app's payload files plus info needed to validate, deploy, manage, and update the app.
Some Windows apps are already provisioned in Windows by default. Read Overview of apps on Windows client devices to find out how you can use Windows PowerShell to find out the name of all these provisioned apps.
Retrieve PackageFamilyName and App ID using PowerShell
Next, we will use PowerShell to find about Snip & Sketch all the details needed to create a Custom type package in the Application Workspace.
We use the Get-AppxPackage cmdlet to list information about the Appx package only:
Get-AppxPackage | Where {$_.Name -match 'ScreenSketch'}
We're going to have a look at three properties here, Name, InstallLocation and PackageFamilyName:
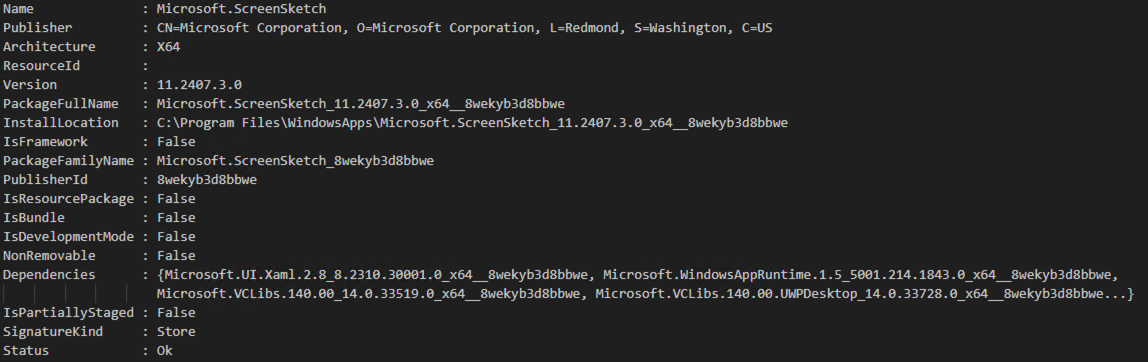
Name - is something we need to make certain, that we are looking at the details of the correct app; the ‘Snip & Sketch’ app.
InstallLocation - is where we can find the AppxManifest.xml file which contains the info the system needs to deploy, display, or update this Windows app. Within it, we can find the ID of the app which in this case is ‘App’. But we can also retrieve it by running:
(Get-AppxPackage | Where {$_.Name -match 'ScreenSketch'} | Get-AppxPackageManifest).package.applications.application.id
PackageFamilyName - is what we need to identify the app. The combination of the PackageFamility Name and ID is needed to launch Snip & Sketch successfully. The ID value can be found in the AppxManifest.xml.
Create an Application Workspace package
We can now bring this all together and create a package in the Application Workspace:
- Navigate to Manage > Workspace > Packages.
- Click
 Create in the tabel toolbar.
 - In the Create package dialog box that opens in Type, select Custom package. Click Next.
- In Overview:
- In the Name field write "ScreenSketch"
- In the Icon field select a desired icon from the
C:\Program Files\WindowsApps\Microsoft.ScreenSketch_8wekyb3d8bbwe\Assetspath. We recommend using the highest available resolution. - Click Next.
- In Entitlements, add the identities to which you want to assign this package.
- Click Create action set in the tabel toolbar.
- In the Create action set dialog box, select Type Launch. Click Confirm.
- Click Create action in the action set toolbar.
- In the Create action dialog box that opens in Type, select Start Windows App and configure the following:
- Change the Name if desired.
- Enter the Package Family Name, previously discovered with the Powershell statement.
- Enter the Application Id, previously discovered with the Powershell statement.